One of my close friends recently approached me with a technical issue. He's a devoted user of QuickBooks Desktop (I know, and yes, I've tried it too), and he has recently opened a new branch. He wanted to utilize the same QuickBooks Intune file for accounting and invoicing at both locations. The idea was to have both branches access the same database without making substantial investments in the existing infrastructure at this point.
Upon taking a quick scan of the current setup, I noticed the presence of Odoo along with some images and text.
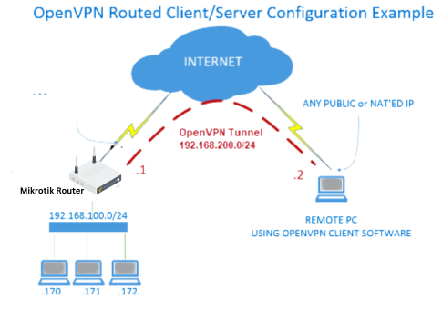
Network Diagram
Mikrotik Router (Router OS V6.49.8)
Eth1 interface(internet facing):192.115.67.26
LAN Interface (bridged) 192.168.100.1/24
Remote Branch (roaming user)
OVPN network 192.168.200.0/24
Logic.
I had several options to consider:
Given that the team primarily uses Windows, I could have simply connected to the Windows VPN and called it a day. However, considering it's Windows and a free service, expectations for reliability might be limited.
Another possibility was setting up an OpenVPN server on the machine running Quickbook. This could have worked, but I had concerns about what would happen when the machine is powered off or its IP address changes. I did try this approach, and it did work, but it had some issues right from the beginning (I plan to write a separate article about this).
The most feasible solution, in the end, was configuring OVPN on Mikrotik. It proved to be the best choice, involving minimal user engagement and leaving a smaller footprint. Additionally, it's easy to monitor and support remotely, reducing the need for excessive calls.
OpenVPN on Mikrotik
OpenVPN Server Configuration in MikroTik Router. In the above setup Mikrotik is going to act as OVPN server. I will make an exception and go right into setting-up of SSL certificate.
Server Configuration: The first step is to create an IP pool (to be assigned to VPN network tunnel), and remote user login and password. The user credentials will be used to authenticate users against when connecting using OpenVPN client.
Feature Title
/ip pool add name=rt-ovpn-pool range=192.168.77.2-192.168.77.254/ppp profile add name=rt-ovpn local-address=192.168.77.1 remote-address=rt-ovpn-pool/ppp secretadd name=Customer1 password=[SomeStrongStuff]profile=ovpnadd name=Customer1 password=[SomeStrongStuff2] profile=ovpnGenerate Certificate on Mikrotik: OpenVPN uses SSL certificate for secure communication. We will create OpenVPN certificate from mikrotik terminal.
Certification Authority (CA)
Server Certificate
Client Certificate
Make certificate templates
Sign certificates and add CRL url.
Export client certificates with keys and CA certificate:
OpenVPN Client Download and Installation: OpenVPN provides multiple VPNClient for most Operating Systems including mobiles. Get VPN Client On installing OpenVPN client in your operating system (should be straight forward). Ensure sure that TAP Virtual Ethernet Adapter has been installed. You should have something like this on your window computer

Connecting OpenVPN Client
OpenVPN software.
Click on plus(+).
Open FILE tab.
Drag And Drop client.ovpn file you have.

Profile Name and Server Hostname Should be autofilled with your Public IP configured during client certificate setup.
Enter the Username and Password you created earlier
Enter Private Key Password (Export Passphrase Of CA)
With the above setup ready and connected you should be able to access your remote office resources such as File Server, Printers and so on without any issue.